Mould making...Here's one way the industry do it.
Until recently, my only knowledge on mould making was basic, rules such as not having undercuts to allow easy removal of a casting and using mold release. I also only had material experience with plaster and silicone, I was aware of fibreglass mould's, but I had never used it on any job or hobby project to date. I have recently discovered a material that the industry also use whilst I was employed at Telegael in Ireland, which is called Aluminium Resin (I refer to it as Alucast for short). It's stronger than plaster, but just as light as polyresin, it's virtually odorless, it can be sanded with a file or a belt sander, each casting cures in about 30-60 minutes and it can be used for silicone and foam latex casting.
 If you're working at home making your own stop-motion film, you can make your mold's in whatever fashion and material feels comfortable for you; However, if you are looking to work in the industry, they expect a level of skill that demonstrates you can make good mold's, with good clean seams, no air pockets in tight spaces and good use of anchor and venting points. The less clean up the puppet makers have to remove for seaming and prepping a casting out of a mold, the better your chances are you'll be noticed by a studio when applying for job positions.
The first thing to tackle is what type of mold to make. A hard mold like Alucast is great for making silicone and foam latex puppets or puppet parts, whereas silicone molds are better for clay or poly resin castings.
The trick to remember which is best for your puppet to be molded in is if you need hard parts or clay parts, a flexible mold, like silicone, is easier to pop them out of (clay in silicone molds are best placed in a fridge before being removed) whereas a hard mold would result in them being destroyed or stuck. However, it's not impossible to do, but you have to have the skill, the right tools and tone of patience to do it, as you'll see further into this post.
The trick to remember which is best for your puppet to be molded in is if you need hard parts or clay parts, a flexible mold, like silicone, is easier to pop them out of (clay in silicone molds are best placed in a fridge before being removed) whereas a hard mold would result in them being destroyed or stuck. However, it's not impossible to do, but you have to have the skill, the right tools and tone of patience to do it, as you'll see further into this post.
Any soft parts, like a foam latex body or a silicone hands, require a hard mold so that they can keep their shape and be removed with ease. The key thing to remember is to always use mould release at every stage of mould-making. I can't stress enough how important mold release is to you, without it, you can tear castings apart, get parts stuck, or worse, fuse a mold together so you would need to destroy the mold and possibly the clay sculpt.
What I'm going to show you now is a demonstration on how to make a relatively "industry" acceptable mould that will give you a much greater understanding of how to make them more efficiently.
Remember to use safety equipment, namely Nitrile gloves when mixing the Alucast and Goggles with a Respirator for sanding later. Also do not get Alucast on your cloths, it does not wash out so make sure to wear protective clothing.
I also want to add that I have learned this style of mold making from moulds I worked with during my time at Telegael in 2016, so to whoever made the moulds originally, I thank you for influencing me with your amazing skills which resulted in this blog entry.
The Things you'll need are...
 Here, I have a 3D printed mould that a student has purchased online. Now firstly, I just want to say here, I'm not saying 3D printed moulds are a bad thing, in fact, I'm very much for using 3D printed moulds for many applications. In order to grow as an industry, you have to adapt the technology as it’s presented to you and use it to your advantage. 3D printing is a great tool and can be a real time saving asset, but I also believe that while high quality 3D printing is still difficult to achieve, there are things the human hand can do that no computer or printer will ever do perfectly, at least not yet, but for now we must co-exist with the changing world and adapt it to our needs.
Remember to use safety equipment, namely Nitrile gloves when mixing the Alucast and Goggles with a Respirator for sanding later. Also do not get Alucast on your cloths, it does not wash out so make sure to wear protective clothing.
I also want to add that I have learned this style of mold making from moulds I worked with during my time at Telegael in 2016, so to whoever made the moulds originally, I thank you for influencing me with your amazing skills which resulted in this blog entry.
The Things you'll need are...
- Respirator
- Nitrile Gloves
- Goggles
- Sculpting tools
- Brass K&S square and round tubing
- Building bricks
- Hack saw or Bandsaw
- Syringe
- Clay
- 8mm/12mm/14mm Beads
- Lighter Fluid
- Cheap small paint brushes
- Mould Release
- Disposable cups
- Digital measuring scales
- Aluminium Resin
- Small hammer
- Small chizel
- Dremel and Extension Pen
- Dremel Sanding bit or Large file
- Dremel Engraving bit
- Paper towel

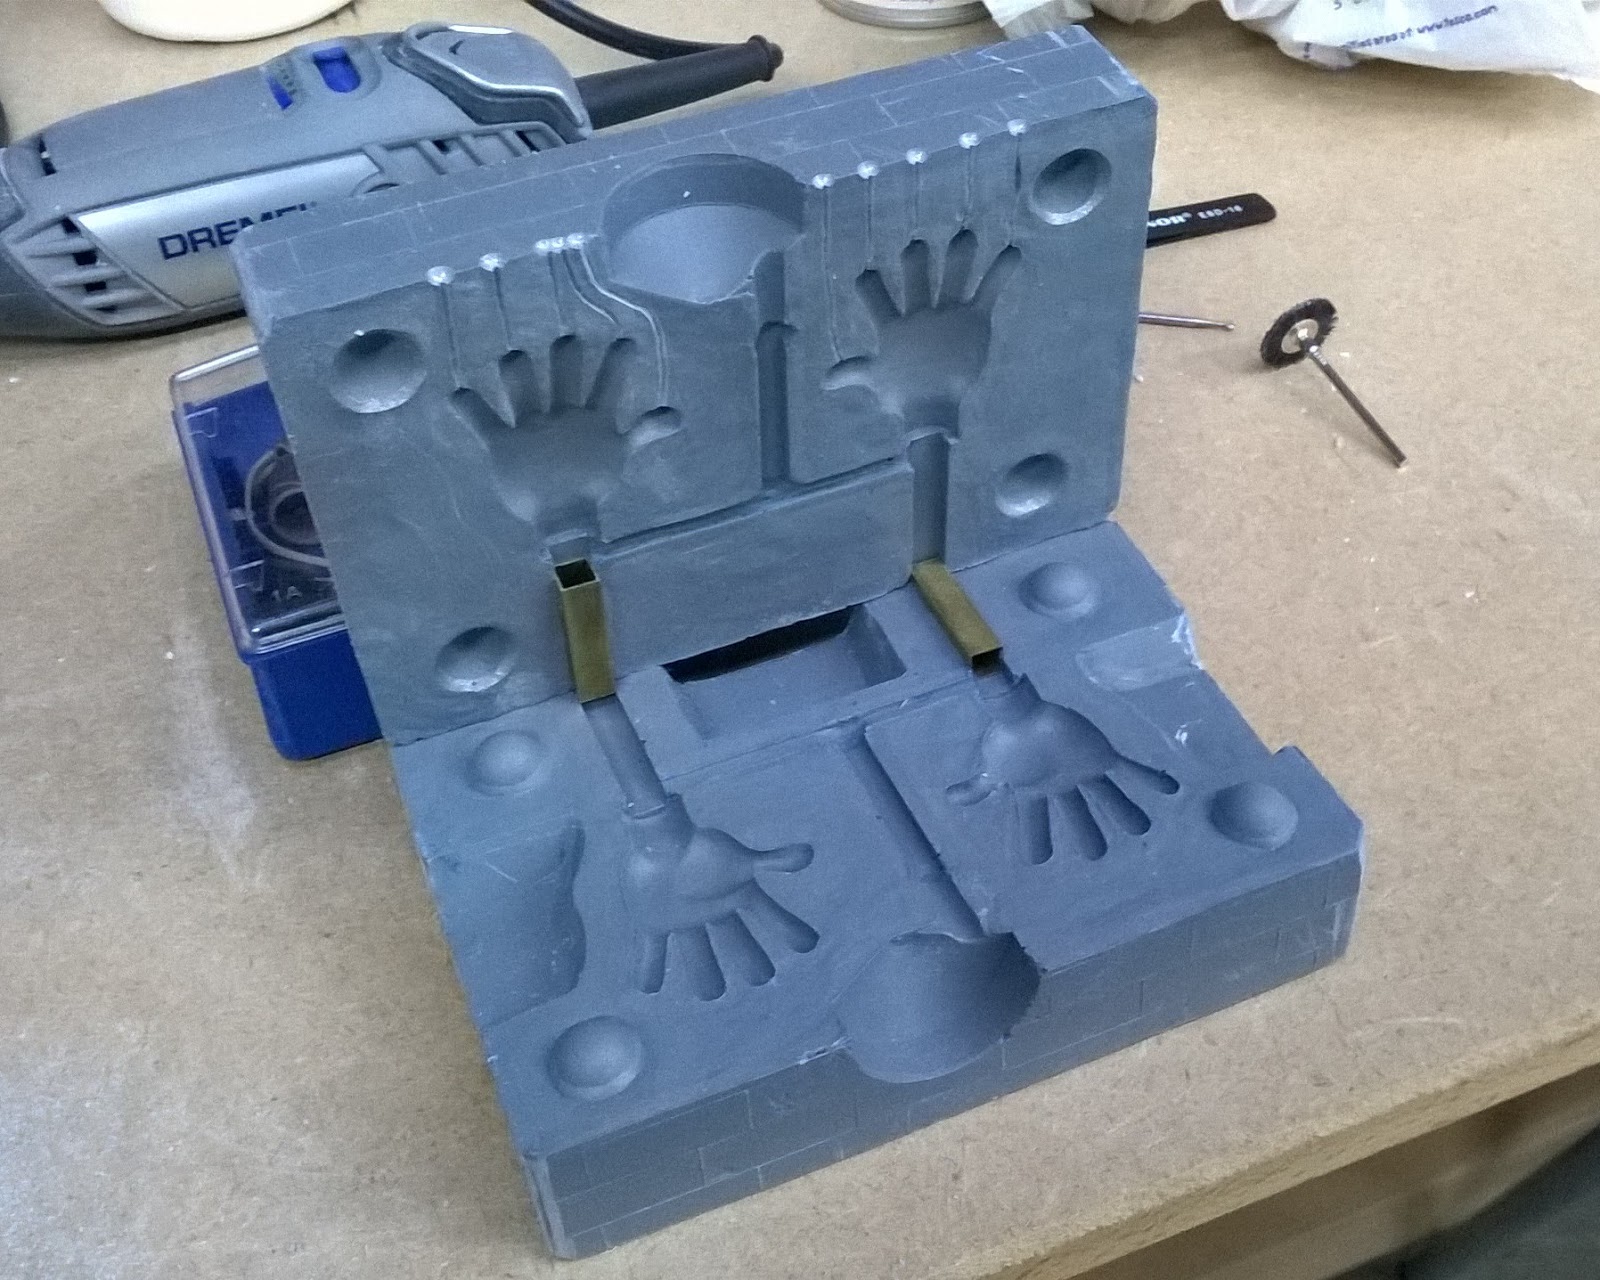
As you can see in the photos, the negative of the mould is full of the printing lines (I refer to these as tree rings) which if this mould was for casting a set of hands for distant shots or mid shots these would be fine. However, for close-up shots, these imperfections would very likely show up in camera, whether through lighting or paint application. So, they have asked me to make a smoother pair for them.
Now normally in this scenario, a silicone master would be cast from the hard mould and cleaned up to be used for making another master copy for future moulds, but since the mould is effectively inappropriate for such a casting it needs to be resculpted, or in this case smoothed out. By spraying as fair amount of mould release into the two halves and melting Monster Clay Medium into the negative, pressing the two halves together and forcing out all the excess (there a very limited window to do this before it cools down so much that it’s no longer this malleable), giving it about one hour in the fridge should give it enough time to pop out of the mould. As I said, this takes skill and a lot of patience; on one of the hands it took me four attempts before it came out in some acceptable way.


As you can see, there are seams that need removing and imperfections from the clay that need to be reworked on top of the smoothing of the hands surface, but before that, I need to add 2cm of K&S square brass tubing (for this sized hand, it requires at least a Stock No.153 and 152) into the wrists to act as anchor points for other K&S pieces to slot onto. That will give you a vague idea of how big or small the K&S can be to hold aluminium wire in position for the hands. The K&S also allows me to hold the sculpt without touching the clay, preventing the clay from becoming too soft from my body temperature which would then make it prone to distortion.
 I have achieved the finished sculpt using my wax sculpting tools, home made loop tools and finishing off with a brush application of lighter fluid removing all tool marks and giving a uniformed finish.
Now for the first half of making the mould. First, rough out how big you think your mould should be. There's is no right or wrong way of doing this, you can try to use your finger thickness as a guide. From the edge of your sculpt you should have at least two or three fingers distance from the edge of the mould. I use the building blocks to gauge my distances, often placing 4 blocks in a North, South, East & West positions to gauge my distances from the walls edge, of course these all vary for different mould sizes. One thing to remember is not to try save space by making a small mould with small edges; whilst there are times that you have no option but to have a thin edge, it is recommended that you try keep your moulds negative space as far from the risk of being damaged as possible.
 At this point its wise to cut off the tip of a syringe using a band-saw, there’s no particular size of syringe required as long as the cut is straight and neat, it does however need to covers two factors: that the syringe can hold more than the recommended amount you would need for your casting, and that the model of the syringe is the same every time you need to purchase more. This will become your negative entry point for injecting silicone into the mold.
For the walls of my moulds (mainly small moulds) I tend to use building blocks, this is because they will always give you “straight” walls (the smaller the brick, the more flexibility it has in a wall set up) and you can build in a "limit line" of different coloured bricks so you know when you have enough material in your mould. I have seen many students use clay up the walls of their building block moulds before now, thinking the resin or silicone will leak through the gaps between the bricks. This is something you really don't need to worry about unless you’re dealing with a highly viscus fluid. Because of the thickness of the gap between the bricks and the consistency of the resin or silicone, they can seep into the cracks but very, VERY, rarely make it through to the other side. I would recommend applying a small sliver of clay up the corners of the brick wall inside the mould and big rolls of clay along the base of the bricks outside of the mould wall for securing your mould onto your board surface.
 You'll now need to build up your clay floor into a level, flat plain. You can do this by using a rolling pin to make a thick sheet of clay (about 3 or 4cm thickness should be enough) that you then cut into 1cm thick, these are what you will use to layout and make up the floor of your mould. You also need to make smaller clay sausage strings which will act as support for your sculpt; depending on the size of your clay sculpture, this will determine the size and thickness your clay sausages need to take in order to support the sculpt and keep it level.
When you start adding your clay strips to block out the surrounding space around the sculpt and the syringe head, make sure you follow a natural seam line on both, you want to make sure you can separate the hands without leaving an obvious seam-line and allow the syringe head to pop out successfully without breaking the mould.
 From the syringe tip you now want to add a channel that will take your silicone from the syringe into your sculpt, for this you can use either round or square brass K&S tubing. There's no required sizes for you to use, other than making sure the tubing is big enough to fit over the syringe tip but not to completely engulf it. Also, make sure that all exposed joins of the K&S are covered slightly in clay so that none of your mould material seeps into the gaps. Make sure you also place the channel tubing about half way into the clay, as well. While I'm on the subject of K&S, you now need to add a third length of 2cm tubing to your sculpts, now making the external square brass Stock No.155. This larger size of brass tubing will become your rigging point after you demould the sculpt and all the K&S; acting as the main bulk of the rig so students can choose how big or small they want their wire and K&S inserts to be for their puppet builds.
I have used 8mm beads as key points here, but I would recommend using something in the size of 12mm or even 14mm. However, keep in mind that you need to make sure the bead is buried slightly over half way, otherwise the slightest undercut will prevent you from removing the bead afterwards. If you don't happen to have any beads around, using a 10p coin (or a coin of a similar shape and size) by digging into the clay and rotating around will give you a circular, negative groove.
Now that you have a finished mould it’s time to apply your mould release spray. Apply a generous amount to the walls and K&S, but be liberal on your sculpt, allow for the spray to dry and then start measuring out your Aluresin. Remember to put your Nitrile gloves on from this point onwards.
 Before using this product, make sure to give the aluminium resin (the largest tin) a really good stir. Very often you will find the aluminium powder has settled at the bottom of the tin and you need to make sure it’s properly mixed up. Shaking the tin will not be enough though, you will need to use a stiff mixing stick. Once the resin is a uniformed silver colour and smooth in consistency with no lumps you can start to measure it out. Aluresin is a 100:15 A&B mix, meaning if you have 100 grams of part A resin you will need 15 grams of part B catalyst for it to harden. Another example of this measurement is 100% to 15% mix, e.g 250 grams (100%) would need 37.5 grams (15%), you can always round off number to its nearest full digit just as long as you don't go too far over. Aluresin is thermoreactive, which means as you mix the two parts together, the chemicals react and start to generate heat which in turn cures and dries out the resin, so you have a very small window to work in, about 4-5 minutes tops.
 Next, you will need to paint in your first small application, about 10-20 grams of part A is enough for this part. Use a cheap soft brush as you want to make sure you get all those tight spaces where air bubbles can get trapped. In this example it’s around the seam of the hands and between the fingers, and don't take too long on this part, but don't rush through it either. If you find that your mix is starting to cure before you have finished, apply the remaining amount to the edge of your mould so it doesn't go to waste and mix up a fresh batch. Keep doing this until you have completely covered all possible edges and spaces that might encourage air being trapped.
 After about 10-15 minutes to allow the first application to cure you can mix up a larger batch to pour carefully into the corners of your mould. Make sure your table surface is level so that you can get a flat top of your mould. If possible, while you are pouring out your resin, have a friend gently shift the mould to allow the resin to settle and level out.


Now for the first half of making the mould. First, rough out how big you think your mould should be. There's is no right or wrong way of doing this, you can try to use your finger thickness as a guide. From the edge of your sculpt you should have at least two or three fingers distance from the edge of the mould. I use the building blocks to gauge my distances, often placing 4 blocks in a North, South, East & West positions to gauge my distances from the walls edge, of course these all vary for different mould sizes. One thing to remember is not to try save space by making a small mould with small edges; whilst there are times that you have no option but to have a thin edge, it is recommended that you try keep your moulds negative space as far from the risk of being damaged as possible.

For the walls of my moulds (mainly small moulds) I tend to use building blocks, this is because they will always give you “straight” walls (the smaller the brick, the more flexibility it has in a wall set up) and you can build in a "limit line" of different coloured bricks so you know when you have enough material in your mould. I have seen many students use clay up the walls of their building block moulds before now, thinking the resin or silicone will leak through the gaps between the bricks. This is something you really don't need to worry about unless you’re dealing with a highly viscus fluid. Because of the thickness of the gap between the bricks and the consistency of the resin or silicone, they can seep into the cracks but very, VERY, rarely make it through to the other side. I would recommend applying a small sliver of clay up the corners of the brick wall inside the mould and big rolls of clay along the base of the bricks outside of the mould wall for securing your mould onto your board surface.

When you start adding your clay strips to block out the surrounding space around the sculpt and the syringe head, make sure you follow a natural seam line on both, you want to make sure you can separate the hands without leaving an obvious seam-line and allow the syringe head to pop out successfully without breaking the mould.

I have used 8mm beads as key points here, but I would recommend using something in the size of 12mm or even 14mm. However, keep in mind that you need to make sure the bead is buried slightly over half way, otherwise the slightest undercut will prevent you from removing the bead afterwards. If you don't happen to have any beads around, using a 10p coin (or a coin of a similar shape and size) by digging into the clay and rotating around will give you a circular, negative groove.
Now that you have a finished mould it’s time to apply your mould release spray. Apply a generous amount to the walls and K&S, but be liberal on your sculpt, allow for the spray to dry and then start measuring out your Aluresin. Remember to put your Nitrile gloves on from this point onwards.


This should cure in about 30 minutes, but I would leave it for at least an hour or so, dependent on room temperature, after which flip over the mould and start to gently remove the clay from below.

Once you have all your clay removed, use a small paint brush dipped in lighter fluid to clean away any excess clay and grime so that you have a clean surface. Then you can start to add the clay cavities which will help you release the mould with less surface tension and give you something to grip into for demoulding.

Be very vigorous with the mould release at this point, the resin will stick to itself if it’s not properly coated, so make sure you spray well along the walls, floor and K&S. Leave to dry and then spray a second coat mainly on the floor of the mould and allow to dry. Once again, paint in a small batch of resin into the edges and spaces where air is likely to be trapped and as before, when this cures, you can mix up another batch and pour carefully into the corners of the mould, again, making sure you keep the resin level as you pour.

Once the second side of the mould is cured, you can now begin to remove all the bricks and all of the clay. Be careful not to cut yourself on the resin as the edges can sometimes be sharp. When you have expose all the mold, you'll need to put on your respirator and goggles for filing and grinding, Aluminium powder is harmful to your lungs and body if inhaled and can be a irritant for your eyes should any parts fly into them.
Take a large file and file down the edges and any lumps that cause the mold to wobble. You can also round off the corners in case the clay inserts you added earlier still retain a sharp edge.
To open your mould (this is where you hope you applied enough mold release earlier) take a small hammer and chisel, then tap along the mould line where the two halves meet starting next to the cavities you emptied earlier. Tap this side two or three times and then rotate the mould over to the next side and repeat the same process. The aim is to open the mould gently, as simply forcing it open is going to damage the mould and potentially the keys that you'll need to hold the mould together. When you apply the wedged shape of the chisel, you're allowing the pressure which is holding the two halves together to be released gently. After a couple of times tapping and rotating your mould, you should now be seeing signs of the halves splitting apart. Now it should be safe enough to prize apart the mold by hand without damaging anything.

As before, remove all the sculpt material from the negative parts of the mould and clean off all the clay material you used to make your cavities. You can use lighter fluid and a small tooth brush to scrub away all unwanted clay remnants but dry off the mould with a paper towel and you nearly have a finished mould. It should now look something like the photo bellow.

Take one side of the mold and mark off with a pencil where your vent channels will need to be. Vent channels are used to allow air to escape from the highest points where air can become trapped when injecting silicone into these moulds, they need to be straight, not connecting and large enough to allow material to pass through but not so big that it becomes a danger to the negative sculpt in the mould.

Always dig out the channel with a Dremel using the smallest ball tipped bit possible, working above the negative of the mould first before the gently Dremeling backwards from the negative and connecting up to the now existing channel.

On the outside wall of the mould it may also be best to Dremel out a small recess into the channel exit point, this will help capture any excess that does come out sits into this recessed area and does not spread everywhere outside of the mould.

Make sure the large K&S rig you are useing for securing your armatures in position is just below the channels exit point to allow the silicone to pass through easily when being injected, the narrower the space it has to pass around the longer it will take to rise up to the top of the mould.

Your mould should now look like this. At this point this is a finished mould, BUT, there are still things you can do to make sure you get a perfect mold, such as filling any air bubbles you have noticed on the seam-line of the sculpt with car body filler, if any vent or channel edges need improving you can tend to those and if some corners or edges still feel sharp or uneven you can fill those down further.
Tip One: After removing the bricks and examining my mould, I found that I could have actually saved material by having my pour line closer to the syringe nozzle (indicated by the red lines on the photo bellow). As I mentioned at the start, Alucast is a strong material and the distance between the syringe negative and then mould edge would have been strong enough to endure the strain from injecting silicone, unlike plaster where the strain been placed in the same space may have ruptured one or both of the walls either side of the syringe negative.

Tip Two: The keys I used here were 8mm beads, but personally I would have preferred to use 12mm or even 14mm beads, the reason behind this is so that there is more of a raised surface to use as a key point whilst also saving on mold material, but for the needs for this demonstration I think they have worked out wonderfully.


Thanks. I'm slowly learning the basics of molding and mold making supplies. It's really good to follow guides and tips from someone who went from the same path.
ReplyDeleteNice article, thank you for wonderful article
ReplyDeleteCouples 3d Moulding Casting Kit
Nice article, thank you for sharing a wonderful information about the curtains. I happy to found your blog on the internet.
ReplyDeleteMemories which will last a lifetime. Time is running very fast, don't be too late. Make It Yourself or Do It Yourself family hand casting kit.
Nice blog..! I really loved reading through this article.
ReplyDeleteNitrile foam gloves
Thank You for sharing informative information about Mould making Silicone Molds
ReplyDeleteThanks for sharing this information about home made mold testing tool. As a homeowner, it is important to protect yourself and your family from the dangers of potentially dangerous mold. Thank you!
ReplyDeletebuy silicone foundant moulds
ReplyDeleteThis comment has been removed by the author.
ReplyDeleteSilicone molds are incredibly useful tools that combine durability, flexibility, and precision. Their ability to capture
ReplyDeleteintricate details, withstand extreme temperatures, and provide a non-stick surface makes
silicon molds essential for a
wide range of applications—from culinary creations to crafting and industrial manufacturing. They’re a fantastic
investment for anyone looking to produce high-quality and consistent results in their projects.
Thanks for the post keep sharing | www.yakon-mold.com
ReplyDeleteInformative
ReplyDeleteKeep your property safe and healthy with professional Northeast Mold Removal services that tackle mold at its source.
ReplyDeleteHigh-quality candle molds and supplies for DIY candle makers and businesses. candle making supplies
ReplyDelete