Building the Xenotyrannus Rex Armature, Part 2
Since my last post I have made some alterations to my Xenotyrannus Rex armature before I start to apply the upholstery foam.


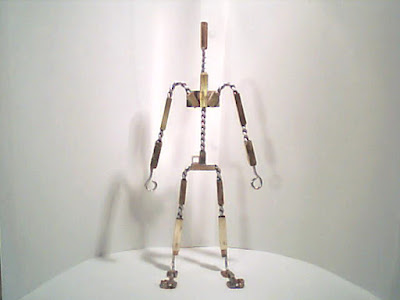
I had made a double joint "collar bone" in the larger arms to give a greater range of motion for a more creature performance, but due to issues with the double joint crumpling up during animation tests I removed the double joint and attached a new single joint instead. However, this also did not work as I had planned. Eventually I admitted defeat and went back to a design I knew worked from Ray's own tests in the late 30's and early 40s. I took the joint acting as the shoulder blade and twisted it from a downwards position into a outward position so the single joint of what would be the shoulder joint could still get a range of motion of back, forth and up and down, but not a full rotation like a human shoulder joint.

The toes also began to irritate me with how long they where, so I removed them from the rod, filed down and trimmed the rod length, and also filed into the steel claw so the rod had somewhere to sit into rather than poking out of the side.


I had planned to make into jointed fingers for the hands, I had come across a gentleman who could make 1.5mm ball joints, but sadly the conversations I had with him did not develop into a purchase of his balljoints, so I opted to make the fingers in wire instead.I had to remake the paddles I had originally designed for soldering the 1.5mm rods and used skills I had learned from my "Chuck Steel: Night of the Trampires" and "Morten and the Spider Queen" employment to drill 2mm holes into the paddles and glue them into position remembering to glue the tips of the wire so it didn't poke through the latex.

I decided to add the K&S brass square tubing onto the hip, which I really should have done BEFORE putting the ball bearings in place. There should be enough coverage for back, belly and side rigging if it is needed. I also drilled out holes in the steel sheet to try lighten the steel. I have since learned it might be best to use perforated steel sheets that are 1mm thick, something to bare in mind for future thought.

I have rotated the spine to compensate for the mid section rod and thankfully still allows me to move my puppet without giving it a stiff back.

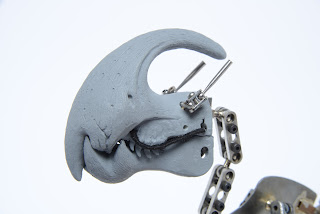
I added the ball jointed ears and wire lips which where two strands of thin aluminium wire covered in thin cotton thread.

One thing to note is that the 3mm joint in the elbow sheered off during animation tests, it was easy to replace but it did give me some food for thought in that my gut instinct told me to look at a larger joint, as my original blueprint had depicted I wanted to use a 6mm joint, but this would have made the arm too fat once the latex and foam was applied. perhaps this would have been better as a 4mm or 5mm joint, it would have meant purchasing two from somewhere like John Wright armatures but it would have spared me this experience, but a enlightening one it has been.

The armature is now ready for the upholstery process.


Comments
Post a Comment