Silver Soldering... Teaching the BA Animation 1st and 2nd Year stop-motion students.

This particular post is to try help explain to students about techniques and "rules" of ball and socket armature fabrication. All these opinions are based on parts from Animation Toolkit, but there maybe some forms of advice that can translate into other armature products or techniques.
Clean your parts in acetone- Swilling your parts around (not shaking) will remove all the factory grease and grim from the metal which if not removed can contaminate the soldering process resulting in no bonding or deformed solder. You may also find some small fragments of metal lodged in parts that have been previously machined, make sure to remove these at this stage of the soldering process.
Fresh metal is the best metal- file or sand the area you want to solder, fresh metal surfaces make for better bonding of solder.
Rod lengths and finishes- there are three methods of soldering for rods, the first is threaded: which hold the rod inplace if its also being inserted into a threaded hole but it can also allow the air inside the flux to escape and the solder to travel down into the hole along the threads. Pure or marked rod: these are more or less the same except for one asset, a pure rod should be futher cleaned with an abrasive material (wet & dry sandpaper for example) whilest the marked rod would be the exact same rod but with a groove down one side of the rod, this alows the soilder to travel down the rod and the outer part whilst still giving a strong bond.
Use flux paste- You want the consistancy to be simular to paste, to watery and it will evaporate before the flux melts and too thick and it will clog up the area. its a little bit of personal preference and a little bit of trial and error to get he consistency right but once you figure it out you will know what to do.
Tippex areas you dont want the flux to go- tippex can be your friend, in recent years I have started to apply it onto my steel ball bearings to reduce the risk of soldier getting onto them, this isn't a 100% sucssessful deterant but it does reduce the risk slightly.
Use small amounts of silver- I would advise you cut your silver spool into leghts or around 5-10cm long, this helps you reduce wastage of precious materials and more stability when applying the silver to the area you want to bond.
Use the right touch for the right thickness of metal- you dont want to use a small torch on a thick metal part, it'll never heat up enough, but too big a flame on a small sheet will damage the part. its mostly down to commonsense, the thicker the material the bigger the flame you will need, but as a average rule I would suggest the following, small pen torches work best on small 1mm sheets of steel, brass tubing and 3mm rods, medium sized flames on 3mm and 6mm joints, medium sized brass tubing, large flames on 9mm and 12mm joints, 5mm thick steel parts and large surface areas minimum 1mm thickness.
Setting up- Now the one rule you want to always try and follow is to let gravity do some of the work for you, if you want the solder to travel along a certain area, you want to make sure the part is positioned in a way it will travel easily and without diversion. When soldering ball joints, I believe it is best to sit the ball bearing upright (so the rod is facing upwards) but I have seen others do this with rod lying across the ceramic surface, so you could probably argue that its what works well for the individual. you also want to make sure everything is pinned in place but no too much that you cant get your flame in to heat the part correctly or place your silver on without causing problems. If you are using unthreaded rods be mindful pressure inside the ball bearing will biuld up and cause the rod to pop out of place during heating up so make sure to position pegs either side of the rod and ball bearing or clamp a heavy cross lock tweezers onto the rod to hold it down (this is where the grove I mentioned earlier in preparing your rod can come in handy)
Heat it until its cherry red- if you apply the silver before it turns this colour the solder will not bond to the steel, and brighter than this colour and theres an increased risk the solder will travel futher that you want or you deform the ball bearing.
Quenching- as soon as you have applied the silver, switched off the flame and the silver is cool enough to move without coming away from the part, pick up with tweezers and drop into clean cold water, the sound it makes is why this process is called Quenching. for larger items bigger than 6mm balljoint or thicker than 5mm, I advise swiveling the part around in the water or leaving in there until ready to move, these retain heat a little longer than smaller part and can still be a little hot if just simply dipped into the water.
Safty Pickle hot bath- Now you can place your part into the safty pickle hot bath, be advised this is a acid project, do not get this on your skin, in your eyes or on your clothing, it wont eat though you like xenomorph blood, but it will distroy tissue and fabrics so wear appropriate safty gear and only use plastic tools at this point. gentle place the part in the hot bath, do not drop in, and wait 30 minutes exactly for the pickle to work its magic, it eats the tops metal layer from the part giving you a nice clean part which will result in a shiny armature with smooth moving joints. the 30 minute timer is the golden zone of saftey pickling, leaving it longer than 30 minutes it eats too much metal off the part and it becomes unusable, less than 30 minutes and the part isn't 100% clean. Another thing to note is if you have to rebath a part thats gone wrong you can only do this 2 maybe 3 times tops, after this you will have to remake the part (which is why I always suggest students to order more than what they need)
Washing- now the part is out of the safety pickle wash in cold water to remove any residue pickle acid.
Dremel cleanup- You will need steel dremel brushed for this part, preferably the wheel kind, though cup version are a good alternative, DO NOT USE ANYTHING OTHER THAN STEEL BRUSHES! Copper version discolor and put a film coat over ball joints making it hard to animate and plastic brushes do not clean at all. you want to dip the part in water as you work so you are removing the grime as you clean, otherwise it will just embed itself into the steel. take care when doing this process as the steel brush can hurt on bare skin and get caught up on gloves. you can also further clean parts with wet& dry sandpaper.
towel off- when each part is dry dry off thoroughly with a paper towel, water residue will make the parts rust up and require another safety pickle bath.
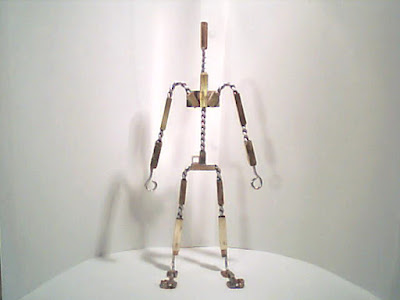
finished- you should now have a completely dry, smooth and very clean part.
I taught all these steps to the BA first and second years, and despite their uncertainty prior to the tutorial, they all really enjoyed the process and were eager to have another go of it.


Henchman provides a wide range of Kester solder at affordable prices. Visit Kester solder to explore more in toolkits.
ReplyDeleteNice articles and your information valuable and good articles thank for the sharing information grease factory
ReplyDelete